Tag Archives: tamari

Carrot Dogs

Carrot dogs are a plant-based alternative to hot dogs, but thanks to a spice-full marinade, just as flavorful! They may sound a little weird, but if you think about what a hot dog is, is a carrot really weirder? Like hot dogs, these carrot dogs can be grilled or cooked on the stove. This recipe can be gluten-free if you use gluten-free tamari and hold the bun or use a gluten-free bun.

They can be prepared ahead of time for camping – steam the carrots, put them in an airtight container in the marinade, and bring them to your campsite in a cooler with plenty of ice. Grill them ideally within 24 hours of putting them in the marinade, otherwise they may start to break down or get mushy. You can leave out the liquid smoke if you are going to be grilling them or cooking them over a fire.

Carrot Dogs

A flavorful marinade helps make carrots take on that classic hot dog taste without the meat. Make this recipe at home on the stove or grill, or bring them on your next camping trip and roast them over a camp fire!

Course Main Course
Cuisine American
Keyword grill, hot dog, plant-based, vegan, vegetarian
Prep Time 10 minutes
Cook Time 10 minutes
Total Time 20 minutes
Servings 6

Ingredients

  • 6 large carrots
  • 1 cup vegetable broth
  • 1/4 cup apple cider vinegar
  • 1/4 cup reduced sodium tamari or soy sauce
  • 1 tablespoon brown or yellow mustard
  • 4 teaspoons smoked paprika
  • 2 teaspoon garlic powder
  • 2 teaspoon black pepper
  • 1/2 teaspoon liquid smoke optional
  • 6 hot dog buns, ideally whole grain

Instructions

  1. Cut ends off of carrots to be about the same length as hot dog bun. Peel carrots. Optional: round off ends with peeler to resemble hot dog.

  2. Steam carrots until slightly tender, or when a sharp knife can pierce them, 12-15 minutes, depending on thickness.

  3. Meanwhile, combine remaining ingredients except buns to make the marinade.

  4. Place carrots into marinade and refrigerate overnight, up to one day (8-24 hours).

  5. Heat grill or skillet with 1 tablespoon oil to medium high heat, remove from marinade, and cook until slightly charred, turning twice, about 5-8 minutes. Serve on a hot dog bun with any desired toppings, such as mustard or chili. 

Image of carrots before grilling
Marinated carrots going into the pan
Image of carrots after cooking
Carrot dogs, finished cooking

Image of several carrot dogs on buns

Spaghetti Squash Pad Thai

Spaghetti Squash Pad Thai

Pad Thai is a very popular Thai dish traditionally made with rice noodles. This recipe replaces the rice noodles with spaghetti squash, replacing refined grains with a nutritious vegetable. Spaghetti squash also has about 5 times less calories than most noodles or pasta! This recipe is based off of an authentic Pad Thai recipe from Basil Cookery School in Chiang Mai, Thailand.


Here are some possible substitutions. You can use more authentic ingredients if you can find them – check international markets:

  • Use rice noodles instead of spaghetti squash – but it won’t be as healthy! Or replace 1/2 of the spaghetti squash with rice noodles
  • Use oyster sauce instead of tamari/soy sauce
  • Use 2 tablespoons of tamarind paste instead of lime juice and brown sugar. This is a very unique flavor that is critical to authentic pad Thai.
  • To make this dish vegetarian, substitute the fish sauce for tamari/soy sauce or another fish sauce alternative and do not substitute oyster sauce for tamari/soy sauce.
  • To make this dish vegan, make it vegetarian (above) and omit the eggs.

Spaghetti Squash Pad Thai

Serves 4
Prep time 10 minutes
Cook time 50 minutes
Total time 1 hour
Dietary Diabetic
Meal type Main Dish
Adapted from an authentic Pad Thai recipe from Thailand, this recipe replaces rice noodles with spaghetti squash, which has about 5 times less calories!

Ingredients

  • 1 spaghetti squash
  • 14oz firm or extra firm tofu
  • 2 tablespoons canola oil, divided
  • 2 tablespoons shallots, minced
  • 1 tablespoon garlic, minced
  • 2 eggs
  • 1 cup carrots, shredded
  • 1 cup bean sprouts
  • 1/4 cup reduced sodium tamari or soy sauce
  • 2 tablespoons fish sauce
  • 1 tablespoon lime juice
  • 1 tablespoon brown sugar

Optional

  • 1/4 cup green onions, sliced
  • crushed peanuts
  • lime wedges

Directions

Step 1
Preheat oven to 400°F. Cut spaghetti squash in half and scoop out the seeds with a spoon. Brush with 1 tablespoon oil and roast on a baking sheet, cut side down, for 35-45 minutes, or until tender. Set aside to cool.
Step 2
Meanwhile, drain tofu and cut in half lengthwise. Place slices between towels and place a heavy item such as a cast iron pan on top to press out excess moisture. Let sit for 10-15 minutes.
Step 3
Once spaghetti squash has cooled, use a fork to shred the flesh into strands. Set aside.
Step 4
Heat a wok or large skillet over medium heat. Add remaining oil, then shallots and garlic. Cook until fragrant, 30-60 seconds.
Step 5
Add tofu to pan and cook, stirring occasionally, until most sides are browned, about 8 minutes.
Step 6
Push tofu to one side of the pan and crack eggs into the open space. Stir until cooked, then add spaghetti squash, carrots, and bean sprouts. Stir and cook for 1-2 minutes or until sprouts start to wilt.
Step 7
Mix tamari or soy sauce, fish sauce, lime juice, and brown sugar. Add to pan and stir to coat everything. Remove from heat and add optional garnishes.

Spaghetti Squash Pad Thai

Tahini Cucumber Noodles

Cucumber Tahini Bowl

Put a twist on traditional salad and enjoy it in the form of “noodles!” With all the components of a salad (raw vegetables, dressing, and a healthy protein), this recipe is hearty enough to fill you up but light enough to keep you from feeling sluggish. It is a perfect meal to make ahead and bring to work or school for lunch.

Recipe inspired by Inspiralized.

Tahini Cucumber Noodles

Serves 4
Prep time 20 minutes
Cook time 30 minutes
Total time 50 minutes
Dietary Diabetic, Gluten Free, Vegan, Vegetarian
Meal type Lunch, Main Dish
Misc Pre-preparable, Serve Cold
Website Inspiralized
Put an exciting *spin* on traditional salad and turn it into "noodles"! Simple combine cucumber, carrots, tofu and a delicious creamy dressing for a tasty lunch or dinner.

Ingredients

  • 1 14-ounce package firm tofu, drained
  • 2 tablespoons reduced sodium tamari or soy sauce
  • 3 English cucumbers (about 6 cups)
  • 2 carrots, peeled (about 1 cup)
  • 1/4 cup tahini
  • 3 tablespoons rice vinegar
  • 2 tablespoons water
  • 1 teaspoon sesame oil
  • 1 clove garlic, minced
  • 1/4 teaspoon salt
  • 2 stalks green onion, sliced (for garnish)

Directions

Step 1
Preheat oven to 400°F. Line a baking sheet with parchment paper.
Step 2
Cut tofu into 3 slices and place between two towels. Place a heavy object such as a cast iron skillet on top to squeeze out the moisture and let sit for 15 minutes, if possible.
Step 3
Cut tofu into cubes and toss with tamari. Let sit for 15 minutes, if possible. Place tofu cubes on baking sheet and bake for 30 minutes, turning once, or until slightly crisp on the outside.
Step 4
Meanwhile, use a spiral slicer to cut the cucumber and carrots into noodles. Alternatively, use a julienne peeler to cut vegetables into long strips.
Step 5
In a small blender or food processor, combine remaining ingredients to make the dressing. Add more water, 1 tablespoon at a time, if necessary, to reach desired consistency. The dressing should be thin enough to pour but not too watery. Refrigerate until ready to serve.
Step 6
In 4 bowls, divide the cucumber, carrots, and tofu. Toss with dressing and serve cold. Garnish with green onion (and sesame seeds if desired).
Step 7
If making this recipe ahead of time for individual meals, portion out the vegetables and tofu into containers. Before serving, pour out any excess water that has been released from the cucumbers. Store the dressing separately and combine just prior to serving.

Cucumber Tahini Bowl

Cucumber Tahini Bowl

Bulgogi Mushrooms

Bulgogi Mushrooms

Traditional bulgogi is a popular Korean dish of thinly sliced marinated beef that is usually grilled, but often stir-fried in home cooking. This simple recipe replaces the meat with vegan-friendly yet meaty-textured portabello mushrooms.

If you need this recipe to be gluten-free, be sure to use tamari or soy sauce that says gluten-free on the label. If you do not use reduced sodium soy sauce, use about 2 tablespoons instead of 1/4 cup and add an extra 2 tablespoons of water, or else it will taste way too salty.


Bulgogi Mushrooms

Serves 4-6
Prep time 2 hours, 10 minutes
Cook time 5 minutes
Total time 2 hours, 15 minutes
Dietary Diabetic, Gluten Free, Vegan, Vegetarian
Meal type Main Dish, Side Dish
Traditional bulgogi is a popular Korean dish of thinly sliced marinated beef that is usually grilled, but often stir-fried in home cooking. This simple recipe replaces the meat with vegan-friendly yet meaty-textured portabello mushrooms.

Ingredients

  • 1lb portabello mushrooms (sliced)
  • 1/4 cup reduced sodium soy sauce or tamari
  • 1/4 cup rice vinegar
  • 2 green onions (thinly sliced)
  • 2 tablespoons water
  • 1 tablespoon gochujang
  • 1 tablespoon sesame oil
  • 4 cloves garlic (minced)
  • 1 teaspoon ginger (minced)

Directions

Step 1
Combine marinade ingredients and add sliced mushrooms. Cover and refrigerate for 2 hours.
Step 2
Heat a skillet over high heat. Drain the sauce from the mushrooms, reserving leftover sauce, and place mushrooms into the pan. Stir occasionally until tender, about 5 minutes.
Step 3
If desired, use leftover sauce as a dipping sauce for another dish. Serve in a lettuce wrap, in a taco, or with Korean side dishes.

Easy Cauliflower Fried “Rice”

Easy Cauliflower Fried "Rice" | Guess Who's Cooking | Healthy, easy, plant based, vegetarian, dairy free, and can be made gluten free and vegan (leave out eggs)  
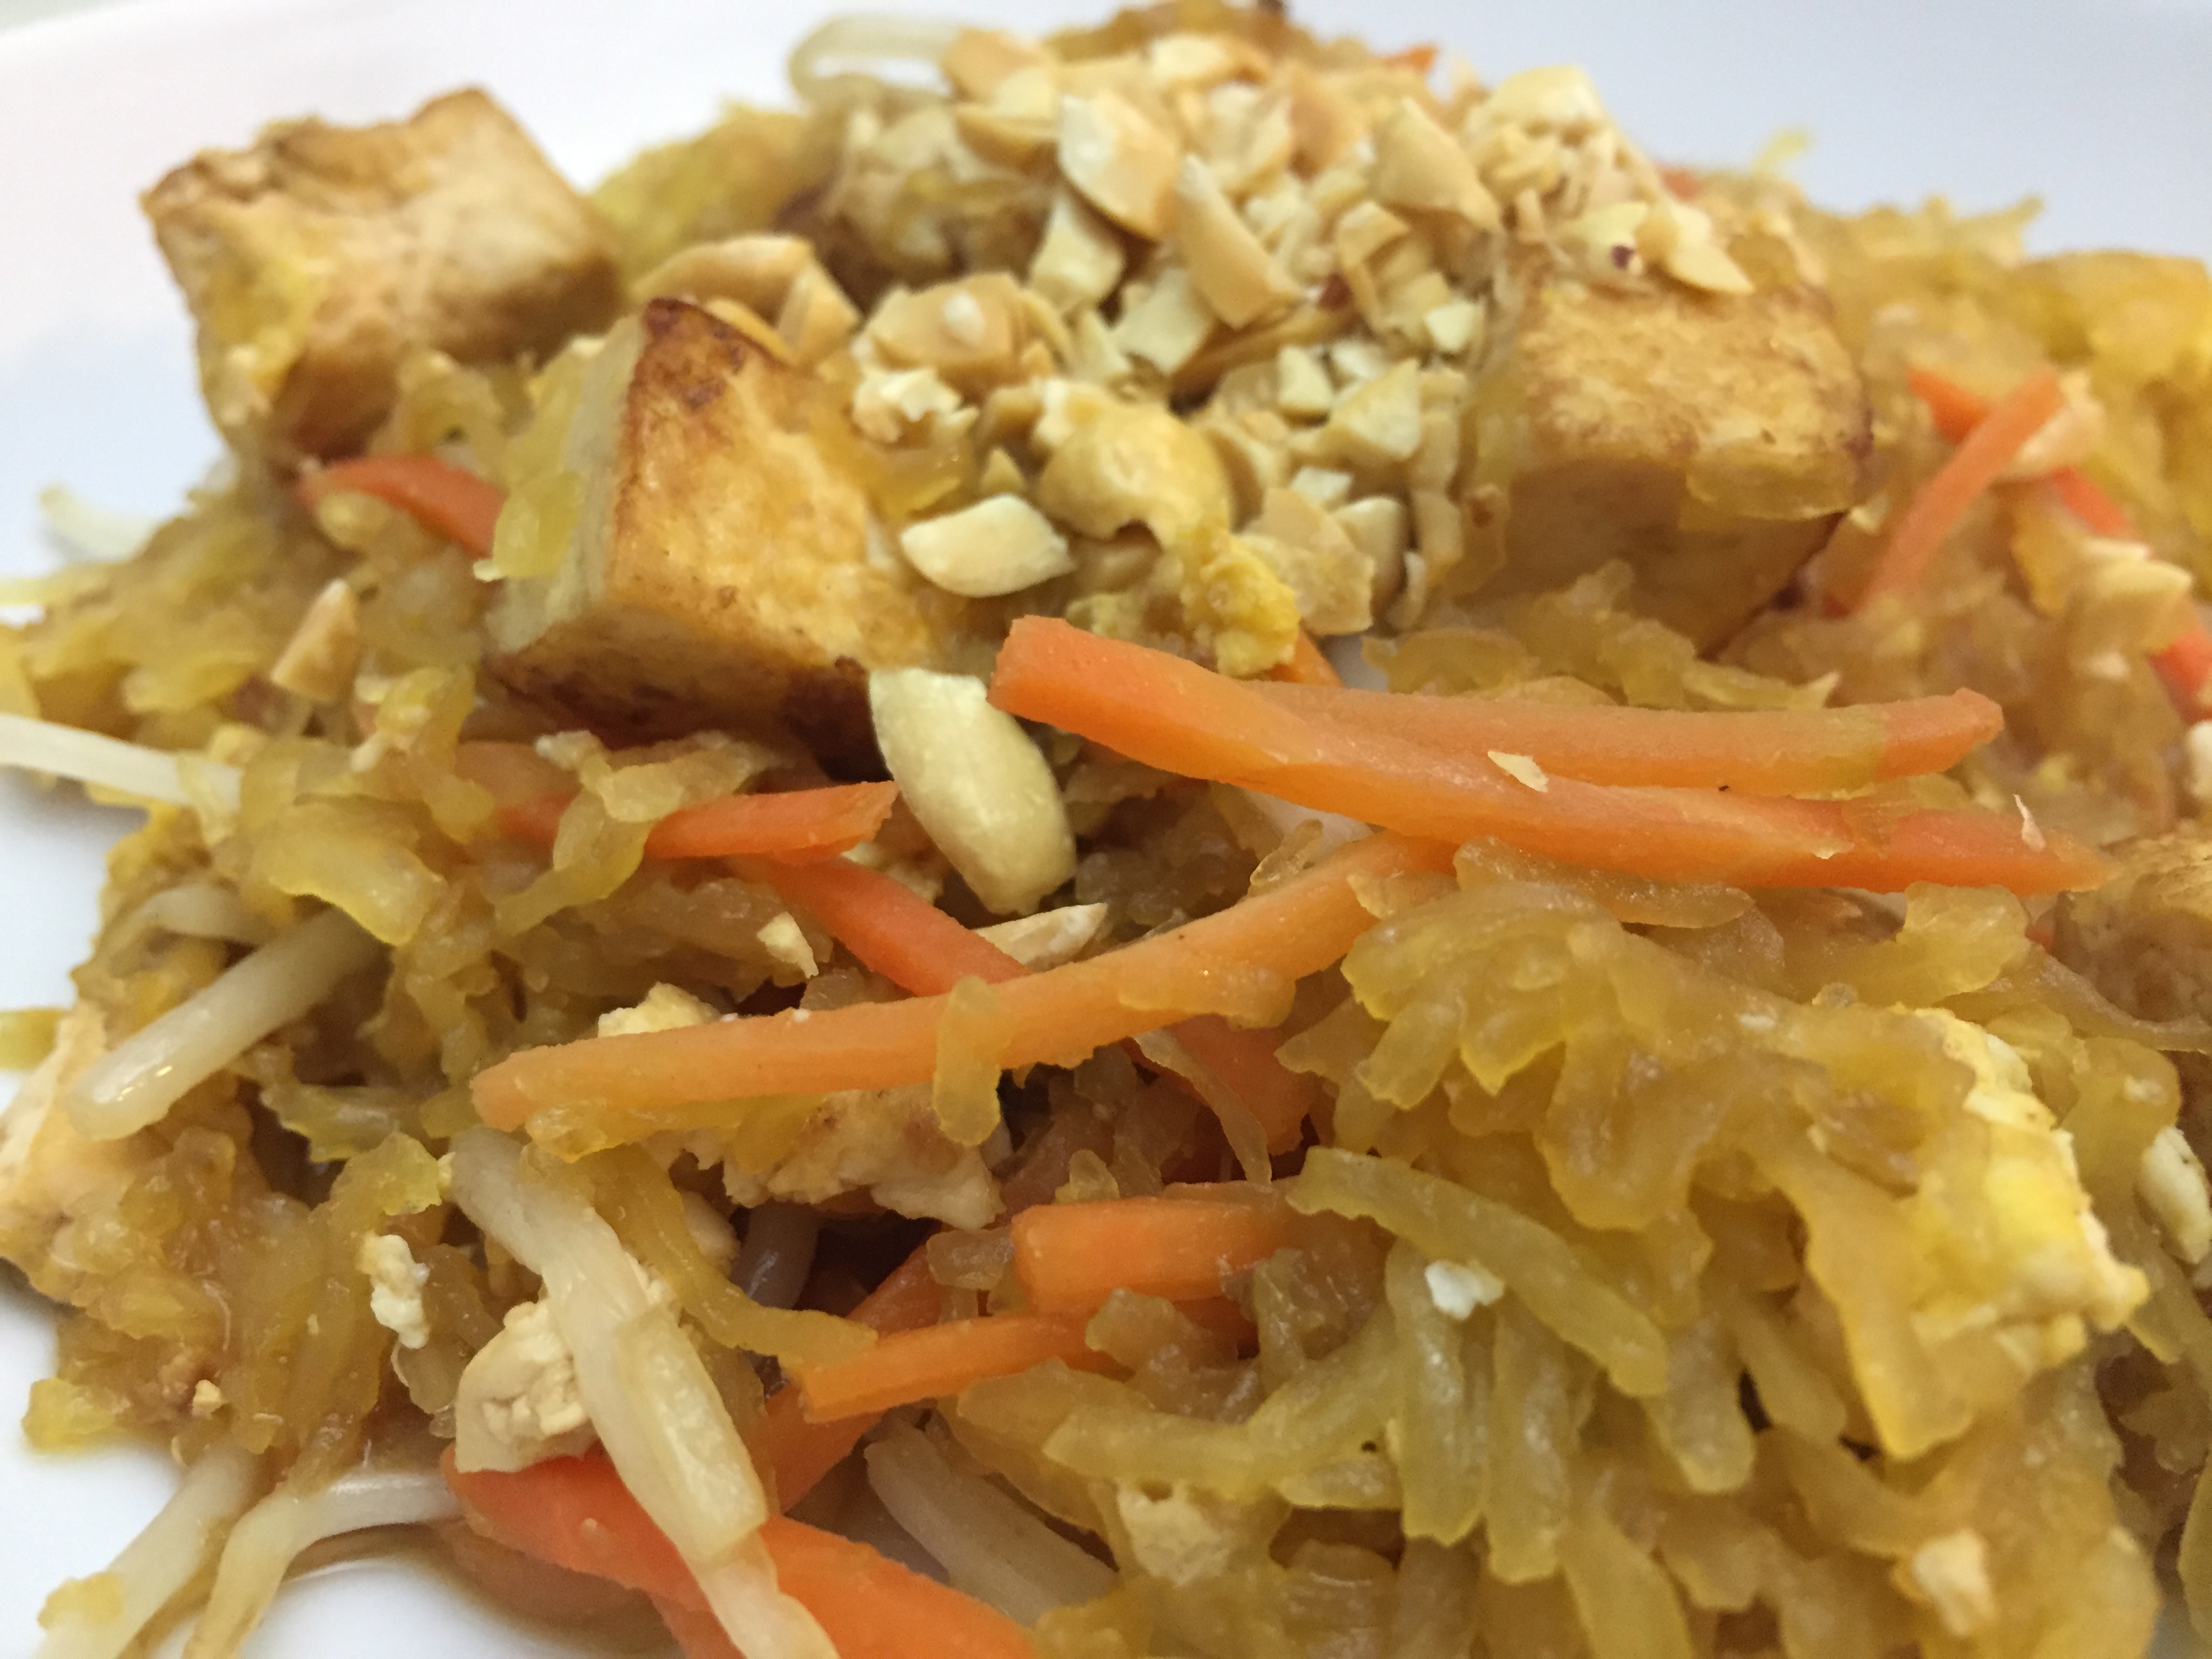
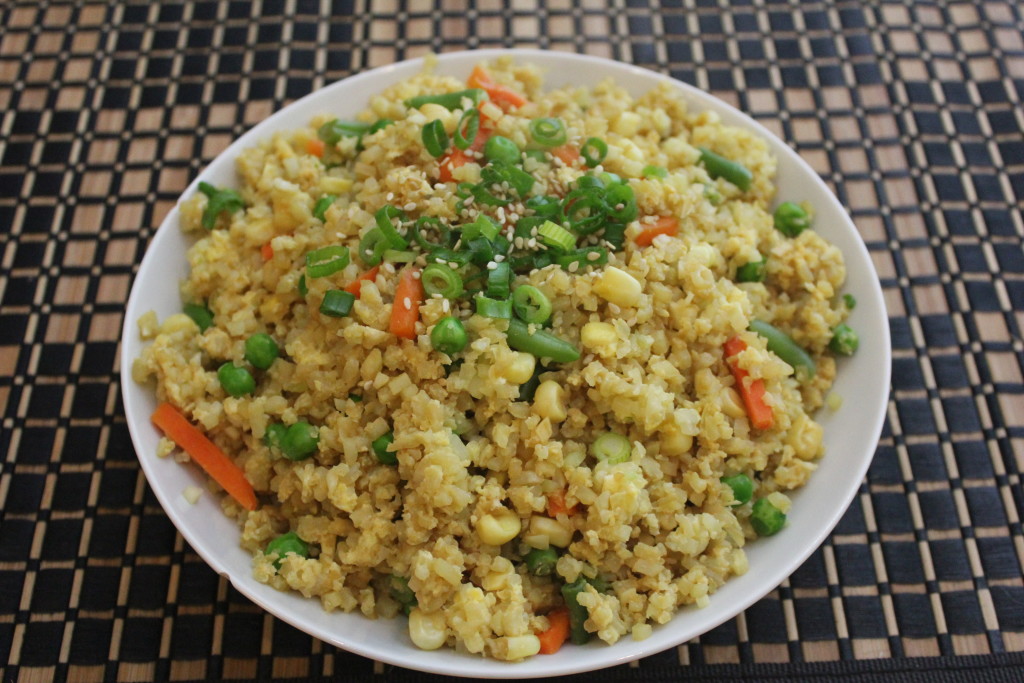
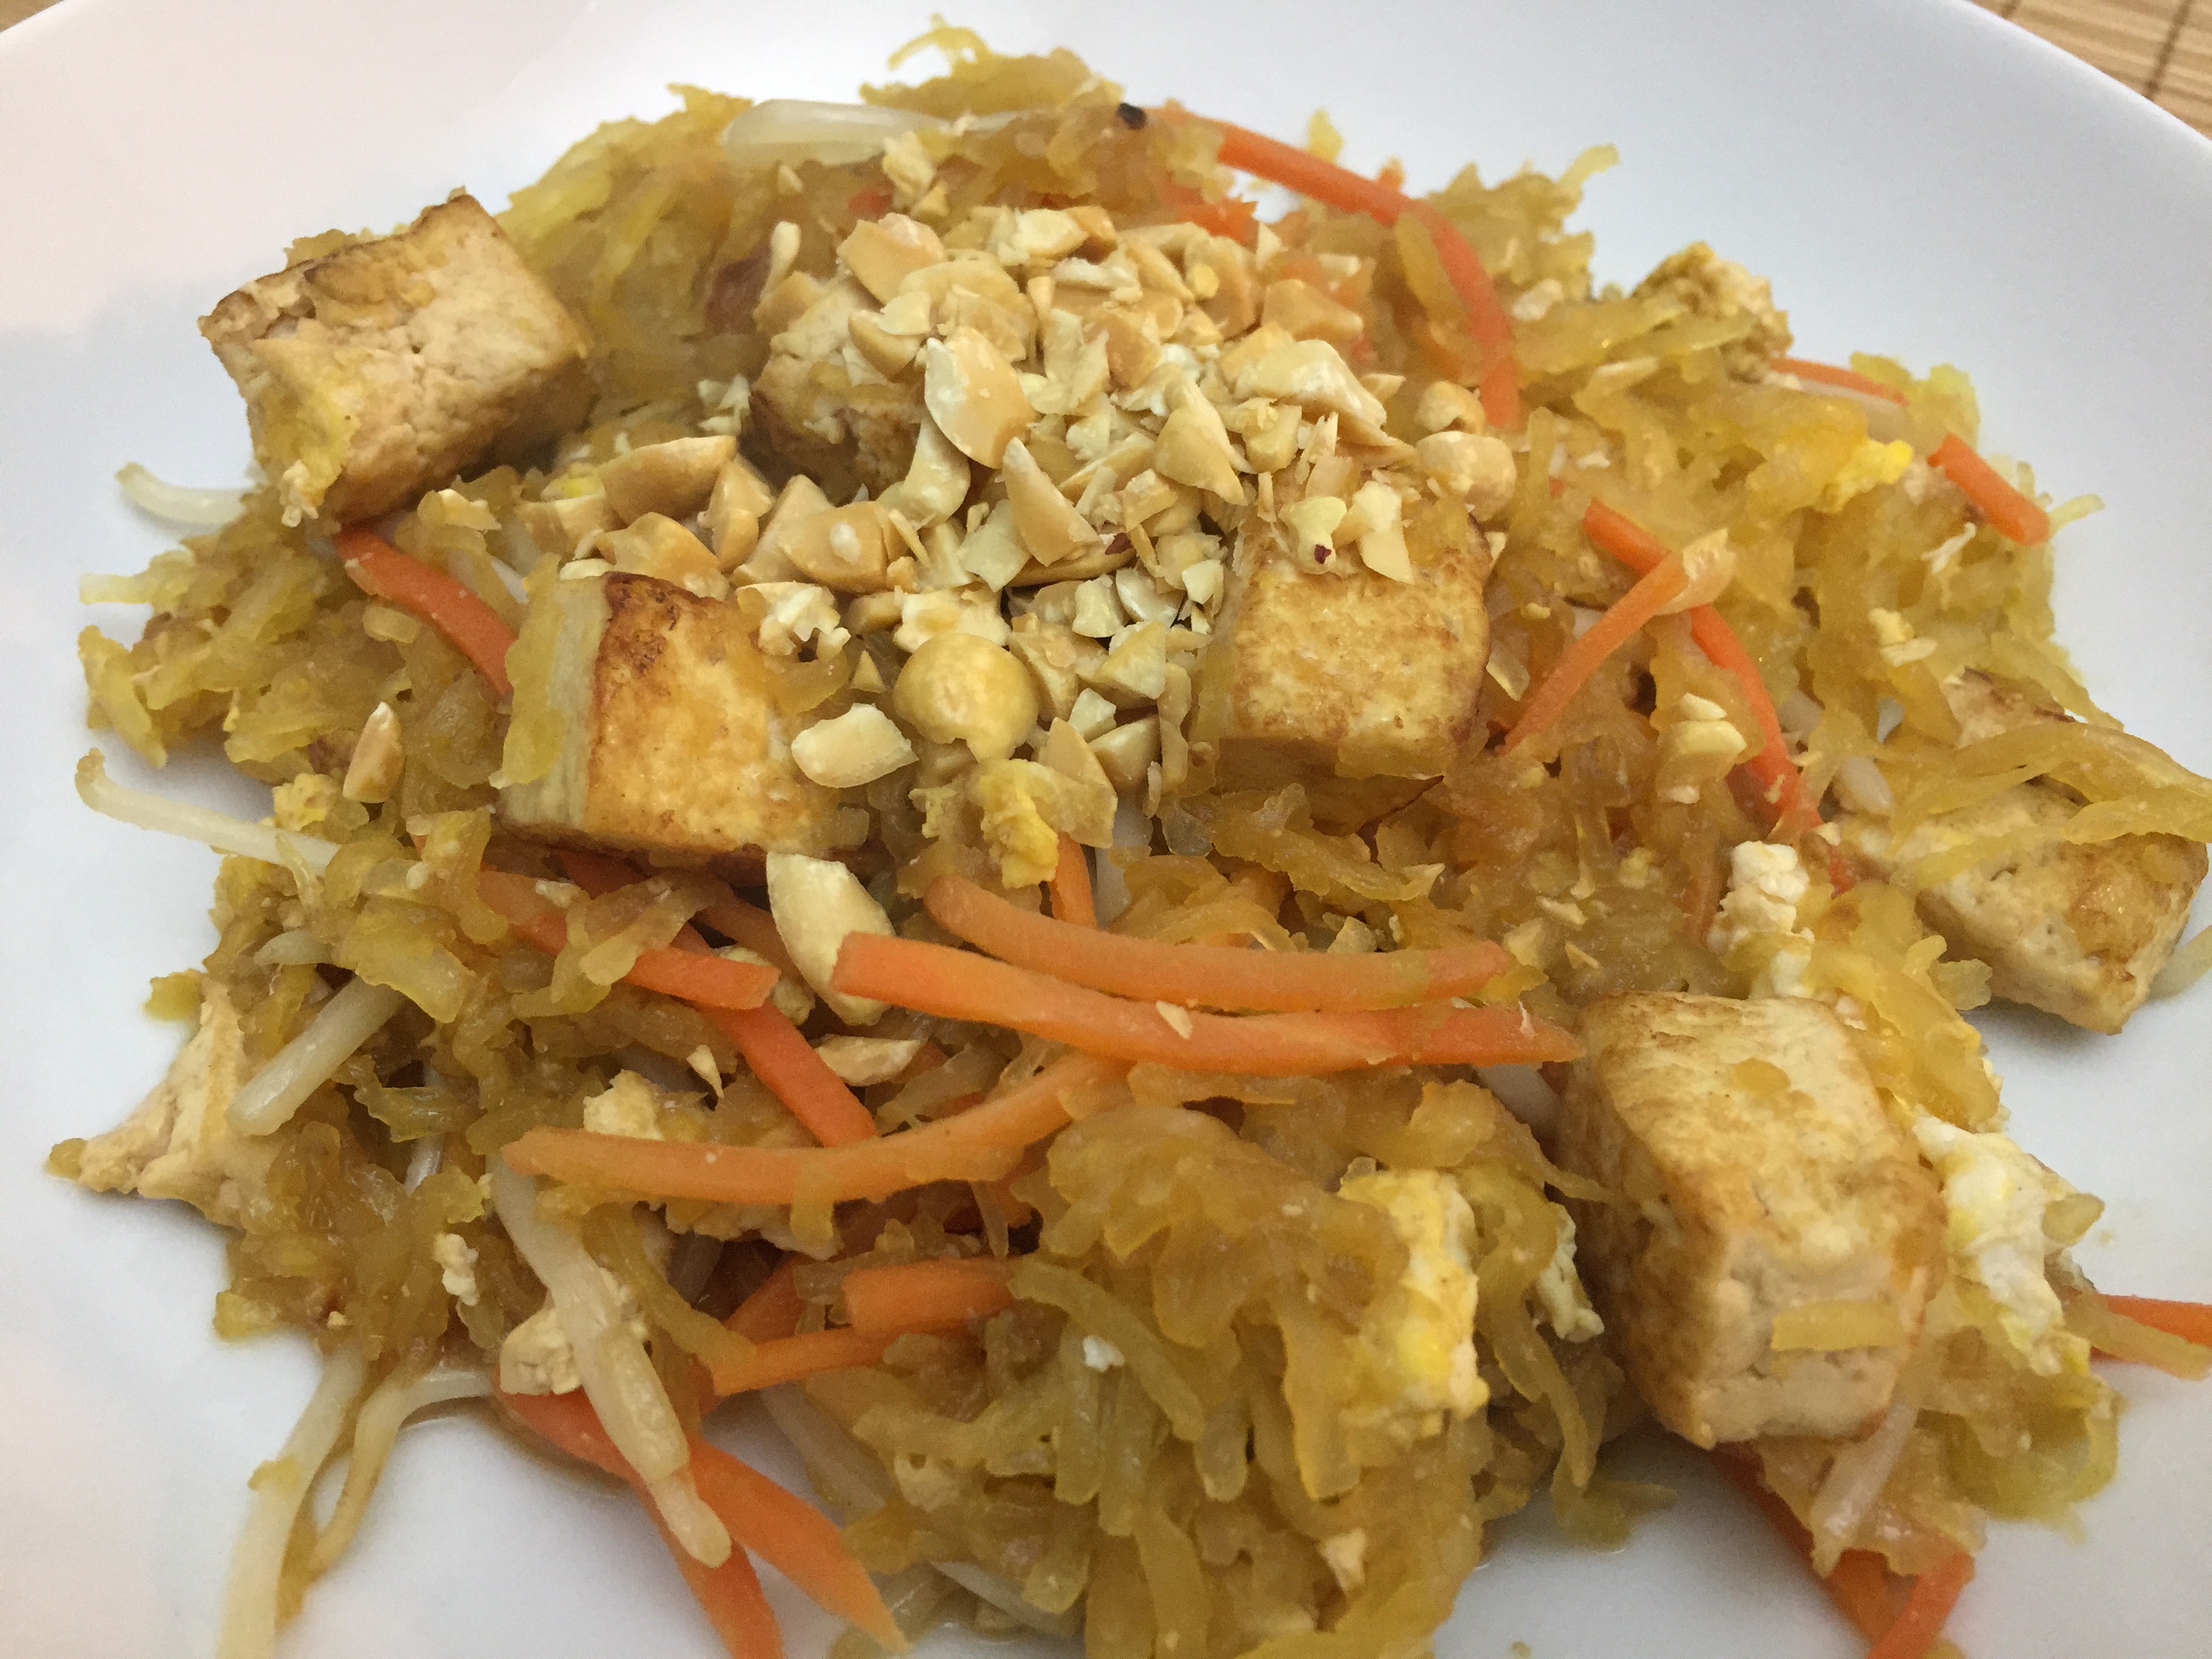
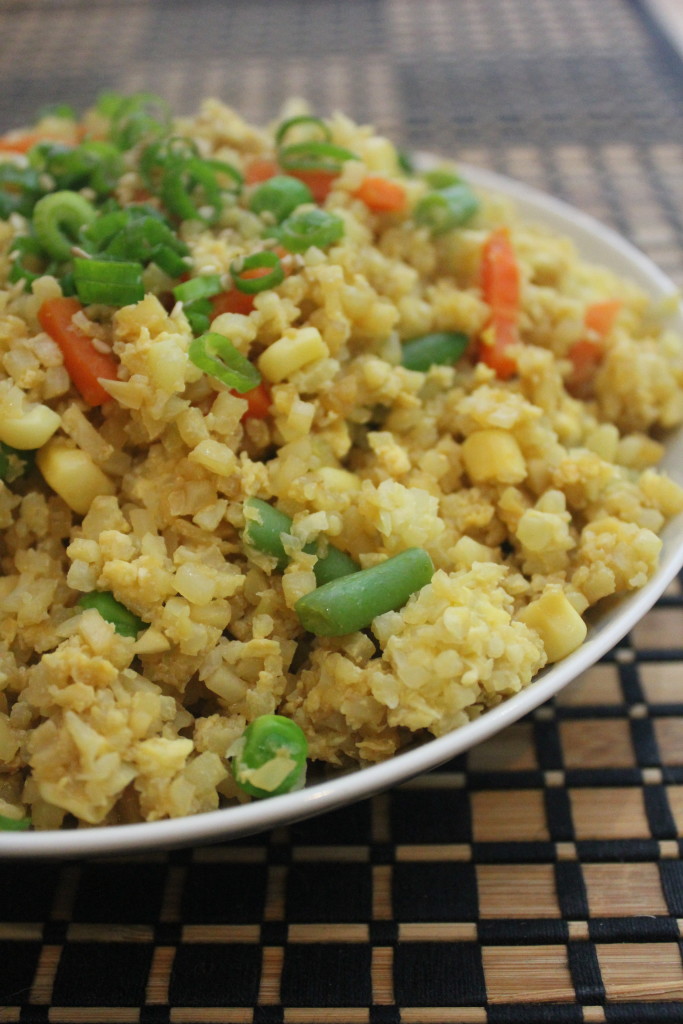
Typical fried rice is mostly refined carbohydrates with extra oil and salt but few vegetables. This recipe still has the flavor and a similar texture, but without the refined carbs, and with a little healthy fat from a healthy oil and tons of veggies! On top of that, it’s quick and easy to make, especially if you buy cauliflower that has already been “riced.” Hint: They sell it at Trader Joe’s now, plus other brands are also carrying it. To make it gluten-free, use gluten-free tamari or soy sauce. To make it vegan, leave out the eggs.

Easy Cauliflower Fried “Rice”

Serves 4
Prep time 5 minutes
Cook time 10 minutes
Total time 15 minutes
Dietary Diabetic, Gluten Free, Vegetarian
Meal type Breakfast, Main Dish, Side Dish
Enjoy fried "rice" with less starch and calories and more nutrients. It's easy to make, especially if you buy cauliflower that has already been "riced."

Ingredients

  • 1 tablespoon oil, such as olive, peanut, canola, or grapeseed
  • 2 cloves garlic (minced)
  • 3 cups cauliflower (grated or riced)
  • 1 cup frozen mixed vegetables
  • 2 large eggs (beaten)
  • 2 tablespoons low sodium tamari or soy sauce
  • salt to taste
  • sliced green onion and/or sesame seeds for garnish

Directions

Step 1
Heat oil in a wok or large skillet over medium high heat. Add garlic and cook for 30 seconds, until fragrant. Add cauliflower and mixed vegetables and cook until just tender, stirring occasionally, about 3-5 minutes.
Step 2
Push cauliflower to one side of the pan to create a space and pour in the eggs into the open part of the pan. Stir just the eggs to scramble until fully cooked, then mix into the cauliflower mixture. Gently stir in tamari and salt to taste. Garnish with green onions and sesame seeds and serve warm.

Easy Cauliflower Fried "Rice" | Guess Who's Cooking | Healthy, easy, plant based, vegetarian, dairy free, and can be made gluten free and vegan (leave out eggs)

Spicy Orange Chicken

Spicy Orange Chicken | Guess Who's Cooking | Healthy, low carb, dairy free, and full of flavor! Gluten free if you use tamari, not soy sauce.

This spicy stir fry has a punch of orange flavor but is free of added sugar! Many Asian-style sauces have lots of added sugar, and that’s what makes them sticky (and not so healthy).

Spicy Orange Chicken

Serves 4
Prep time 10 minutes
Cook time 20 minutes
Total time 30 minutes
Dietary Diabetic, Gluten Free
Meal type Lunch, Main Dish
This spicy stir fry has a punch of orange flavor but is free of added sugar! Many Asian-style sauces have lots of added sugar, and that's what makes them sticky (and not so healthy).

Ingredients

  • 1lb boneless skinless chicken breast (cubed)
  • juice of 1 orange (about 1/2 cup)
  • zest of 1 orange (about 1 tablespoon)
  • 1/3 cup low sodium chicken broth
  • 1/4 cup low sodium tamari or soy sauce
  • 1 tablespoon chili sauce, such as sambal oelek
  • 1 clove garlic (minced)
  • 1/2 Medium onion (diced)
  • 1 cup broccoli florets
  • 2 cups bell pepper (chopped)
  • 2 tablespoons oil, such as canola, peanut, or grapeseed (divided)

Directions

Step 1
In a medium bowl, marinate chicken in orange juice for about 20 minutes.
Step 2
Meanwhile, combine chicken broth, tamari and orange zest and set aside.
Step 3
Heat 1 tablespoon oil in a wok or large skillet over medium-high heat. Drain orange juice from chicken and place chicken in pan. Cook, stirring occasionally, until chicken in golden on the outside and opaque on the inside. Remove from pan.
Step 4
Add remaining oil to pan, then add onions and cook for 2 minutes, stirring occasionally. Add garlic and cook 30 seconds. Add broccoli and cook 2 minutes. Add bell peppers, and cook 2 minutes.
Step 5
Add chicken back to pan and stir. Pour sauce over mixture and stir. Cook until heated thoroughly and vegetables are just fork tender.

Thai Stuffed Peppers

Thai Stuffed Peppers
Change up the standard old stuffed peppers with this Thai-flavored recipe that loads up the veggies, turns up the flavor, and skips the cheese. To make this a vegan/vegetarian dish, use precooked whole grains such as quinoa, buckwheat, or brown rice instead of turkey.


Thai Stuffed Peppers

Serves 6
Prep time 25 minutes
Cook time 25 minutes
Total time 50 minutes
Tired of plain old stuffed peppers? Add some international flair with these healthy Thai stuffed peppers.

Ingredients

  • 6 medium bell peppers
  • 1 tablespoon cooking oil, such as canola, coconut, or olive
  • 1lb lean ground turkey (organic preferred, or at least no antibiotics used)
  • 1/2 cup yellow onion (diced)
  • 1 teaspoon garlic (minced)
  • 2 cups Chinese or Japanese eggplant (chopped)
  • 2 cups white mushrooms (diced)
  • 1/2 cup natural peanut butter (organic preferred)
  • 1 1/2 tablespoon low sodium tamari or soy sauce
  • 2 teaspoons sambal oelek or other hot/chili sauce to taste

Directions

Step 1
Preheat oven to 400˚F. Cut tops off bell peppers and set aside. Remove rind and seeds from the inside and discard. Remove bell pepper stems and chop, then set aside.
Step 2
Heat oil in a large skillet over medium high heat. Add the onion and turkey and stir occasionally until meat is mostly cooked, about 3-4 minutes. Add garlic, eggplant, and mushrooms, until vegetables start to soften, stirring occasionally. Add chopped bell pepper tops and cook for about 1 minute.
Step 3
Combine peanut butter, tamari, and sambal oelek in a small bowl, blender, or food processor. Stir into turkey mixture and remove from heat. Place bell pepper bottoms into a baking dish such as an 8x8" pan or cake pan. Fill with turkey mixture, then bake for 20-25 minutes until tops start to brown and bell peppers become tender and look a little shriveled on top. Serve warm.


Thai Stuffed Peppers

Asian Chicken Marinade

Asian Chicken Marinade | GuessWhosCooking.com | Healthy, easy, simple, gluten free, dairy free

This simple, healthy Asian-flavored marinade can be used for baked or grilled chicken.

Asian Chicken Marinade

Serves 4 - 6
Prep time 5 minutes
Cook time 30 minutes
Total time 35 minutes
This simple, healthy Asian-flavored marinade can be used to bake or grill chicken.

Ingredients

  • 3 tablespoons low sodium tamari
  • 1 tablespoon rice wine vinegar
  • 1 tablespoon cooking oil, such as grapeseed, canola, or olive oil
  • 1 tablespoon minced garlic
  • 1 teaspoon minced ginger
  • 1 - 1 1/2lb boneless skinless chicken (breast, thighs, or both)

Directions

Step 1
Combine all ingredients except chicken in a medium bowl, mixing well. Add chicken, cover with marinade, and cover the bowl. Refrigerate for 2-24 hours.
Step 2
Grill chicken on an outdoor grill or on a stovetop grill pan, flipping once nice grill marks have formed, until internal temperature reaches 165° F, or finish in oven once both sides have nice grill marks. Another option is to bake at 350° F until internal temperature reaches 165° F, about 20-30 minutes, depending on the thickness of the chicken.
Step 3
Serve sliced or chopped on a salad.

Pan-Fried “Noodles” with Vegetable Stir Fry

d
Pan-Fried "Noodles" with Vegetable Stir Fry

Pan-Fried “Noodles” with Vegetable Stir Fry

This recipe replaces unhealthy fried refined noodles with light pan-fried spaghetti squash. It's delicious!

Ingredients

  • 1 Medium spaghetti squash
  • olive oil
  • 1lb chicken, fish, or scallops (bite-sized pieces)
  • 1 egg white
  • 2 teaspoons corn starch
  • 1/2 teaspoon salt
  • 1 Medium yellow onion
  • 1/2lb snow peas
  • 1/2lb shiitake mushrooms
  • 1/4lb bean sprouts
  • 1 tablespoon Shaoxing rice wine (or substitute dry sherry)
  • 2 tablespoons low-sodium tamari
  • 1/4 teaspoon white pepper
  • peanut oil

Directions

Step 1
Preheat oven to 400 degrees F. Cut the spaghetti squash in half and remove the seeds. Brush with olive oil, then place face-down on a baking sheet. Bake for 30-40 minutes or until tender. Let cool.
Step 2
Meanwhile, whisk the egg white in a medium bowl, then add corn starch, salt, and protein of choice (chicken, fish, or scallops) and combine. Cover and refrigerate for about 20 minutes.
Step 3
Combine the Shaoxing rice wine, tamari, and black pepper, then set aside.
Step 4
Heat 2 tablespoons peanut oil in wok or large pan. Add the chicken, fish or scallops and stir fry for a few minutes until mostly cooked. Set aside in a dish, leaving excess oil in pan or letting oil pool in the dish and adding any remaining oil back to the wok.
Step 5
Add 1-2 tablespoons peanut oil to the pan, less if some oil remains from the previous step. Add the onion and cook for a few minutes, stirring occasionally, until it starts to become translucent. Add the mushrooms and cook until they are mostly soft, stirring occasionally. Add the snow peas and cook another 2-3 minutes, until they are bright green and no longer dull. Add the bean sprouts and cook 1 more minute.
Step 6
Add the chicken, fish, or scallops back to the wok, then add the sauce and combine. Set aside in another dish, then wipe out the pan.
Step 7
Once the spaghetti squash has cooled, use a fork or spoon to scoop out the flesh, which will resemble noodles.
Step 8
Heat the wok over medium heat, then add 2 tablespoons peanut oil. Add enough spaghetti squash to form a solid layer about 1/2 inch thick on the bottom of the pan. Once it starts to become golden brown on the bottom, flip the spaghetti squash and cook until the other side starts to turn golden brown. Repeat with remaining squash if necessary. Place the squash on a serving plate.
Step 9
Top the squash with the vegetable stir fry and serve.

Pan-Fried "Noodles" with Vegetable Stir Fry

Easy Whole Wheat Scallion Pancakes

These savory pancakes are similar to Chinese and Korean pancakes, but are made with whole wheat flour. They may not be completely authentic, but they are easy to make and even easier to eat. You could experiment with other finely chopped or shredded veggies too, such as carrots or bell peppers.

Healthy Whole Wheat Scallion Pancake - similar to Chinese or Korean pancakes. Guess Who's Cooking

Whole Wheat Scallion Pancakes

Serves 4-8
Prep time 5 minutes
Cook time 30 minutes
Total time 35 minutes
Meal type Appetizer, Breakfast, Lunch, Main Dish, Side Dish, Snack
These savory pancakes are similar to Chinese and Korean scallion pancakes, but have a healthy twist with whole wheat flour.

Ingredients

Pancakes

  • 4 large eggs
  • 1 1/2 cup water
  • 1 cup whole wheat flour
  • 1 1/2 cup green onions (or about 8 stalks)
  • 1 teaspoon salt (or to taste)
  • 2 teaspoons oil (grapeseed, canola, coconut, or olive oil)

Dipping Sauce

  • 2 tablespoons low sodium tamari or soy sauce
  • 1 tablespoon rice wine vinegar
  • 1 teaspoon sesame oil

Directions

Pancakes
Step 1
Add eggs to a large bowl and whisk. Add water and flour and whisk until well combined.
Step 2
Slice green onions into 1-inch pieces. Add to batter, along with salt.
Step 3
Heat a medium nonstick skillet over medium heat. Add about 1/2 teaspoon oil to the pan to lightly coat the bottom.
Step 4
Add about 1 cup of batter to the pan. Swirl the pan to make the pancake an even round shape, and use a wooden spoon to spread out the scallions if necessary.
Step 5
When the edges start to brown and the underside is golden brown, about 3-4 minutes, flip the pancake. Continue cooking until the underside is golden brown, another 3-4 minutes. Set aside and repeat steps 3-5 until you've used up all the batter. Cut into wedges and serve with dipping sauce.
Dipping Sauce
Step 6
Whisk together ingredients for dipping sauce.